
Huawei P10 Display Assembly with Frame Replacement

What you need

  1. Huawei P10 Display Assembly with Frame Replacement, Back Cover: step 1, image 1 of 3 Huawei P10 Display Assembly with Frame Replacement, Back Cover: step 1, image 2 of 3 Huawei P10 Display Assembly with Frame Replacement, Back Cover: step 1, image 3 of 3
    • Switch off your phone.

    • Remove the two Pentalobe P2 screws at the bottom.

    • Remove the SIM card tray.

  2. Huawei P10 Display Assembly with Frame Replacement: step 2, image 1 of 3 Huawei P10 Display Assembly with Frame Replacement: step 2, image 2 of 3 Huawei P10 Display Assembly with Frame Replacement: step 2, image 3 of 3
    • Insert a plastic opening tool between the display and the case starting at the bottom area of your phone.

    • Carefully pry the display with its parts out of the case.

    • Getting the prying tool in will require some effort, be careful not to slide the tool too much or you might slightly damage the housing.

    • After you pried out the bottom end, use the opening tool to open the clamps on both sides.

  3. Huawei P10 Display Assembly with Frame Replacement: step 3, image 1 of 2 Huawei P10 Display Assembly with Frame Replacement: step 3, image 2 of 2
    • Don't open the phone all the way, yet. The cable for the standby and volume buttons is still connected to the back cover.

    • Swing open the phone backwards.

    • Use a spudger to disconnect the power- and volume button flex cable.

  4. Huawei P10 Display Assembly with Frame Replacement, Battery: step 4, image 1 of 1
    • Remove the two Phillips #00 screws.

  5. Huawei P10 Display Assembly with Frame Replacement: step 5, image 1 of 2 Huawei P10 Display Assembly with Frame Replacement: step 5, image 2 of 2
    • Use tweezers to remove the two cable brackets.

  6. Huawei P10 Display Assembly with Frame Replacement: step 6, image 1 of 3 Huawei P10 Display Assembly with Frame Replacement: step 6, image 2 of 3 Huawei P10 Display Assembly with Frame Replacement: step 6, image 3 of 3
    • Use a spudger to disconnect the battery, the interconnect and the display flex cable.

  7. Huawei P10 Display Assembly with Frame Replacement: step 7, image 1 of 2 Huawei P10 Display Assembly with Frame Replacement: step 7, image 2 of 2
    • The battery is glued in place with two adhesive strips. One with a pull tab and one without.

    • Peel out the adhesive strip which is placed beneath the battery by steadily pulling at the tab in a flat angle.

    • It is likely that the adhesive strip rips. In this case you can grab and twist it around a tweezers tip a couple of times and then continue.

    • Use an iOpener to loosen the remaining adhesive.

  8. Huawei P10 Display Assembly with Frame Replacement: step 8, image 1 of 2 Huawei P10 Display Assembly with Frame Replacement: step 8, image 2 of 2
    Tool used on this step:
    Tesa 61395 Tape
    $5.99
    Buy
    • Take care to not bend or puncture the battery.

    • Insert an opening pick or spudger beneath the battery and carefully pry it out.

    • Remove the battery.

    • When reassembling your phone, replace old adhesive with stretch release adhesive strips, double-sided tape, or pre-cut adhesive strips.

    • Never reinstall a battery that has been bent or damaged during removal.

  9. Huawei P10 Display Assembly with Frame Replacement, Display Assembly with Frame: step 9, image 1 of 2 Huawei P10 Display Assembly with Frame Replacement, Display Assembly with Frame: step 9, image 2 of 2
    • Remove the four Phillips #00 screws.

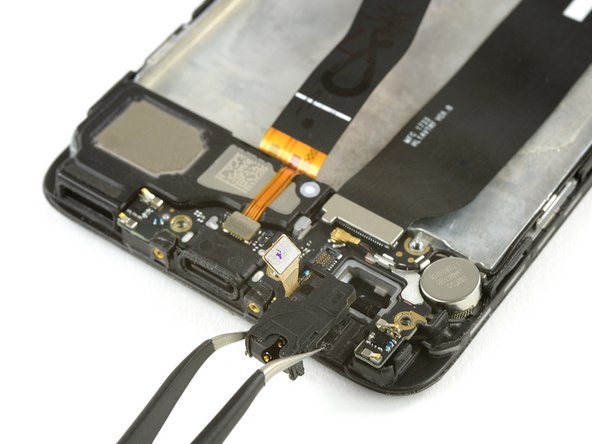
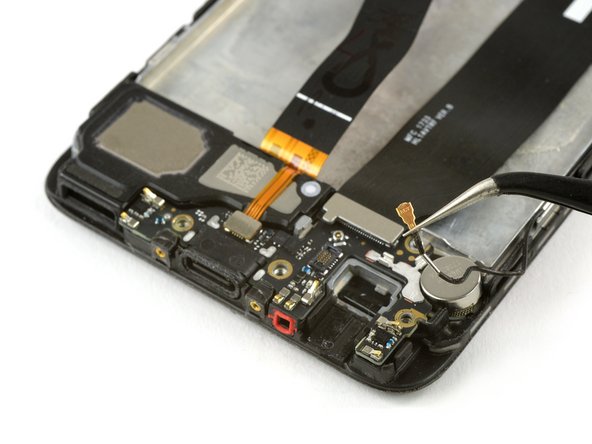
    • Use tweezers to remove the metal plate that covers the charging board and the main flex cable.

  10. Huawei P10 Display Assembly with Frame Replacement: step 10, image 1 of 3 Huawei P10 Display Assembly with Frame Replacement: step 10, image 2 of 3 Huawei P10 Display Assembly with Frame Replacement: step 10, image 3 of 3
    • Use the flat end of a spudger to disconnect the flex cable of the headphone jack.

    • Remove the headphone jack with tweezers. There's a little adhesive underneath so it can be a bit sticky.

    • Unplug the antenna cable with tweezers.

  11. Huawei P10 Display Assembly with Frame Replacement: step 11, image 1 of 3 Huawei P10 Display Assembly with Frame Replacement: step 11, image 2 of 3 Huawei P10 Display Assembly with Frame Replacement: step 11, image 3 of 3
    • Disconnect the main flex cable with a spudger and remove it.

    • Disconnect the loudspeaker flex cable.

    • Carefully remove the charging board.

  12. Huawei P10 Display Assembly with Frame Replacement: step 12, image 1 of 3 Huawei P10 Display Assembly with Frame Replacement: step 12, image 2 of 3 Huawei P10 Display Assembly with Frame Replacement: step 12, image 3 of 3
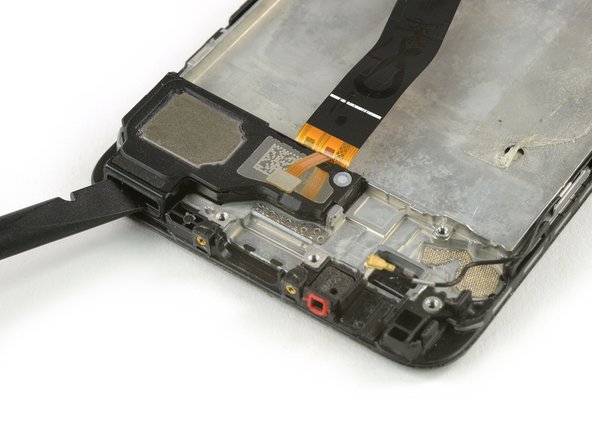
    • Remove the vibration motor. If the adhesive is too strong, heat an iOpener to soften it and ease removal.

    • Use the flat end of a spudger to pry up under the speaker.

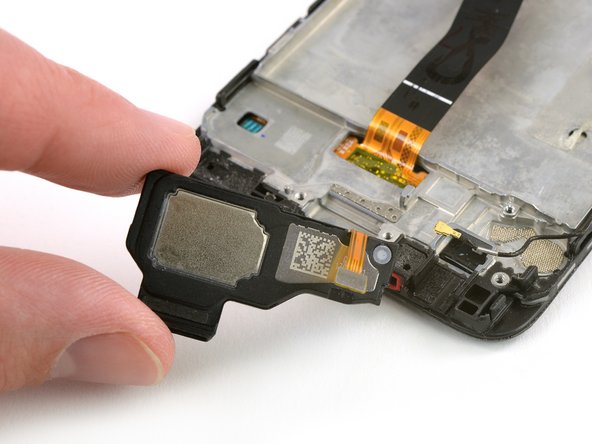
    • Remove the loudspeaker.

  13. Huawei P10 Display Assembly with Frame Replacement: step 13, image 1 of 1
    • Remove the rubber gasket with tweezers.

    • If the gasket is included in your new part, there is no need to remove it from the old one.

  14. Huawei P10 Display Assembly with Frame Replacement: step 14, image 1 of 1
    • Remove the four Phillips #00 screws from the motherboard.

  15. Huawei P10 Display Assembly with Frame Replacement: step 15, image 1 of 1
    • Disconnect the antenna cable and remove it.

  16. Huawei P10 Display Assembly with Frame Replacement: step 16, image 1 of 3 Huawei P10 Display Assembly with Frame Replacement: step 16, image 2 of 3 Huawei P10 Display Assembly with Frame Replacement: step 16, image 3 of 3
    • Use the pointed end of a spudger in the top right corner of the motherboard and pry it out until you can get a good grip.

    • The front and the rear cameras are still connected to the motherboard. Don't damage them while you remove the motherboard.

    • Remove the motherboard.

    • On the back of the motherboard there are thermal pads (pink rubber-like gobs) for heat dissipation. If these thermal pads broke or are too dried out you might need to apply new thermal pads on the new display assembly or the motherboard.

  17. Huawei P10 Display Assembly with Frame Replacement: step 17, image 1 of 3 Huawei P10 Display Assembly with Frame Replacement: step 17, image 2 of 3 Huawei P10 Display Assembly with Frame Replacement: step 17, image 3 of 3
    Tool used on this step:
    Tesa 61395 Tape
    $5.99
    Buy
    • Remove the earpiece speaker with a tweezer.

    • Take care of the metal connectors to not bend them.

    • Carefully remove the proximity sensor from its recess.

    • Before reassembly check your new part for any components that might need to be transferred from the old one.

    • When reassembling your phone replace old adhesive with double-sided tape or pre-cut adhesive strips.

Conclusion

To reassemble your device, follow these instructions in reverse order. When reassembling apply new adhesive where it's necessary.

25 other people completed this guide.

Dominik Schnabelrauch

Member since: 11/23/16

202,836 Reputation

682 Guides authored

Team

iFixit Member of iFixit

Staff

135 Members

16,734 Guides authored

5 Comments

Are the pink/purple blobs unter the motherboard thermal paste? If so, should I re-apply any when reassembling?

Martin Düren - Reply

The answer might come to late, as you most likely finished the repair in the last 5 years, but it might still be useful for others:

Yes, the purple blobs under the mainboard are thermal paste.

If the paste is still soft you could potentially reuse it but I would highly recommend to use some new thermal paste.

Nils Hennings -

Gonna upload an easy and faster way to do it whitout removibg the battery or upper boards and cameras, wait for it, my 1st guide.

mauro-diaz1 - Reply

I Need screen for p smart huawei2018

mbc judo - Reply

I didn’t add the tape. I don’t know why the battery comes with it, plus, it is ultra strong, I was all the time afraid to ruin the battery, but fortunatly, everything went well

Ciro Monteiro - Reply

Add Comment

View Statistics:

Past 24 Hours: 1

Past 7 Days: 8

Past 30 Days: 43

All Time: 15,387