Before disassembling your iPhone, discharge the battery below 25%. A charged lithium-ion battery can catch fire and/or explode if accidentally punctured.
Power off your iPhone before beginning disassembly.
Remove the two 3.4 mm Pentalobe screws on either side of the Lightning port.
The next two steps demonstrate the Anti-Clamp, a tool we designed to make the opening procedure easier. If you aren't using the Anti-Clamp, skip down three steps for an alternate method.
Turn the handle clockwise 360 degrees or until the cups start to stretch.
Make sure the suction cups remain aligned with each other. If they begin to slip out of alignment, loosen the suction cups slightly and realign the arms.
Insert an opening pick under the screen when the Anti-Clamp creates a large enough gap.
If the Anti-Clamp doesn't create a sufficient gap, rotate the handle a quarter turn.
Don't crank more than a quarter turn at a time, and wait a few seconds between turns. Let the Anti-Clamp and time do the work for you.
Opening the display on the 6s Plus separates a thin strip of adhesive around the perimeter of the display. If you prefer to replace the adhesive, have a set of new adhesive strips ready before you continue. It's possible to complete the repair without replacing the adhesive, and you probably won't notice any difference in functionality.
Apply a suction cup to the lower left corner of the display assembly.
If your display is badly cracked, covering it with a layer of clear packing tape may allow the suction cup to adhere. Alternatively, very strong tape may be used instead of the suction cup. If all else fails, you can superglue the suction cup to the broken screen.
Gently grasp the display assembly and lift it up to open the phone, using the clips at the top of the front panel as a hinge.
Open the display to about a 90º angle, and lean it against something to keep it propped up while you're working on the phone.
Don't open the display more than 90º—it is still connected to the top of the phone by the display, digitizer, and front camera cables which can tear easily.
Add a rubber band to keep the display securely in place while you work. This prevents undue strain on the display cables.
In a pinch, you can use an unopened canned beverage to support the display.
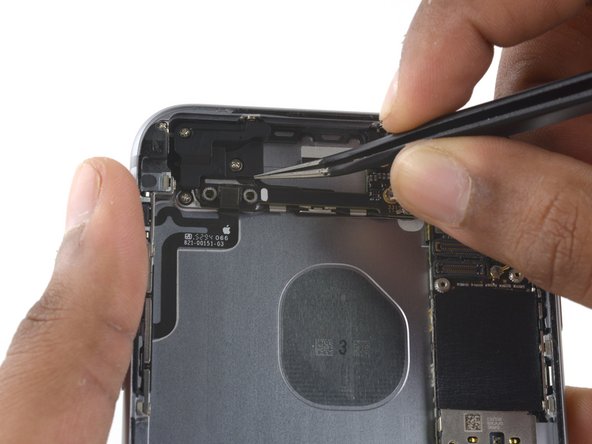
Remove two Phillips screws securing the battery connector bracket to the logic board, of the following lengths:
One 2.9 mm screw
One 2.3 mm screw
Throughout this guide, keep careful track of your screws so that each one goes back where it came from during reassembly. Installing a screw in the wrong place can cause permanent damage.
During reassembly, it's critical to place this 3.0 mm screw in the top-right corner of the bracket. Placing it anywhere else may damage the logic board.
Use a plastic opening tool to disconnect the digitizer cable by prying it straight up from its socket on the logic board.
When reconnecting the digitizer cable, do not press the center of the connector. Press one end of the connector, then press the opposite end. Pressing in the center of the connector can bend the component and cause digitizer damage.
If you're still having trouble removing the battery, apply a few drops of high concentration (90% or higher) isopropyl alcohol under the edge of the battery in the area of the broken adhesive strip(s).
Tilt the phone up so the isopropyl alcohol can flow toward the adhesive strip.
Hold for 1–2 minutes to allow the isopropyl alcohol to weaken the adhesive.
Use an opening pick or the flat end of a spudger to slowly pry up the battery.
If your replacement battery came in a plastic sleeve, remove the sleeve before installation by pulling it away from the the ribbon cable.
If there's any alcohol solution remaining in the phone, carefully wipe it off or allow it to air dry before installing your new battery.
Before you adhere the replacement battery, temporarily reconnect the battery connector to the logic board socket. This ensures that the battery is properly aligned in its recess.
Adhere the battery, disconnect it, and continue reassembling your device.
If your new battery doesn’t have adhesive preinstalled, refer to this guide to replace the adhesive strips.
Perform a hard reset after reassembly. This can prevent several issues and simplify troubleshooting.